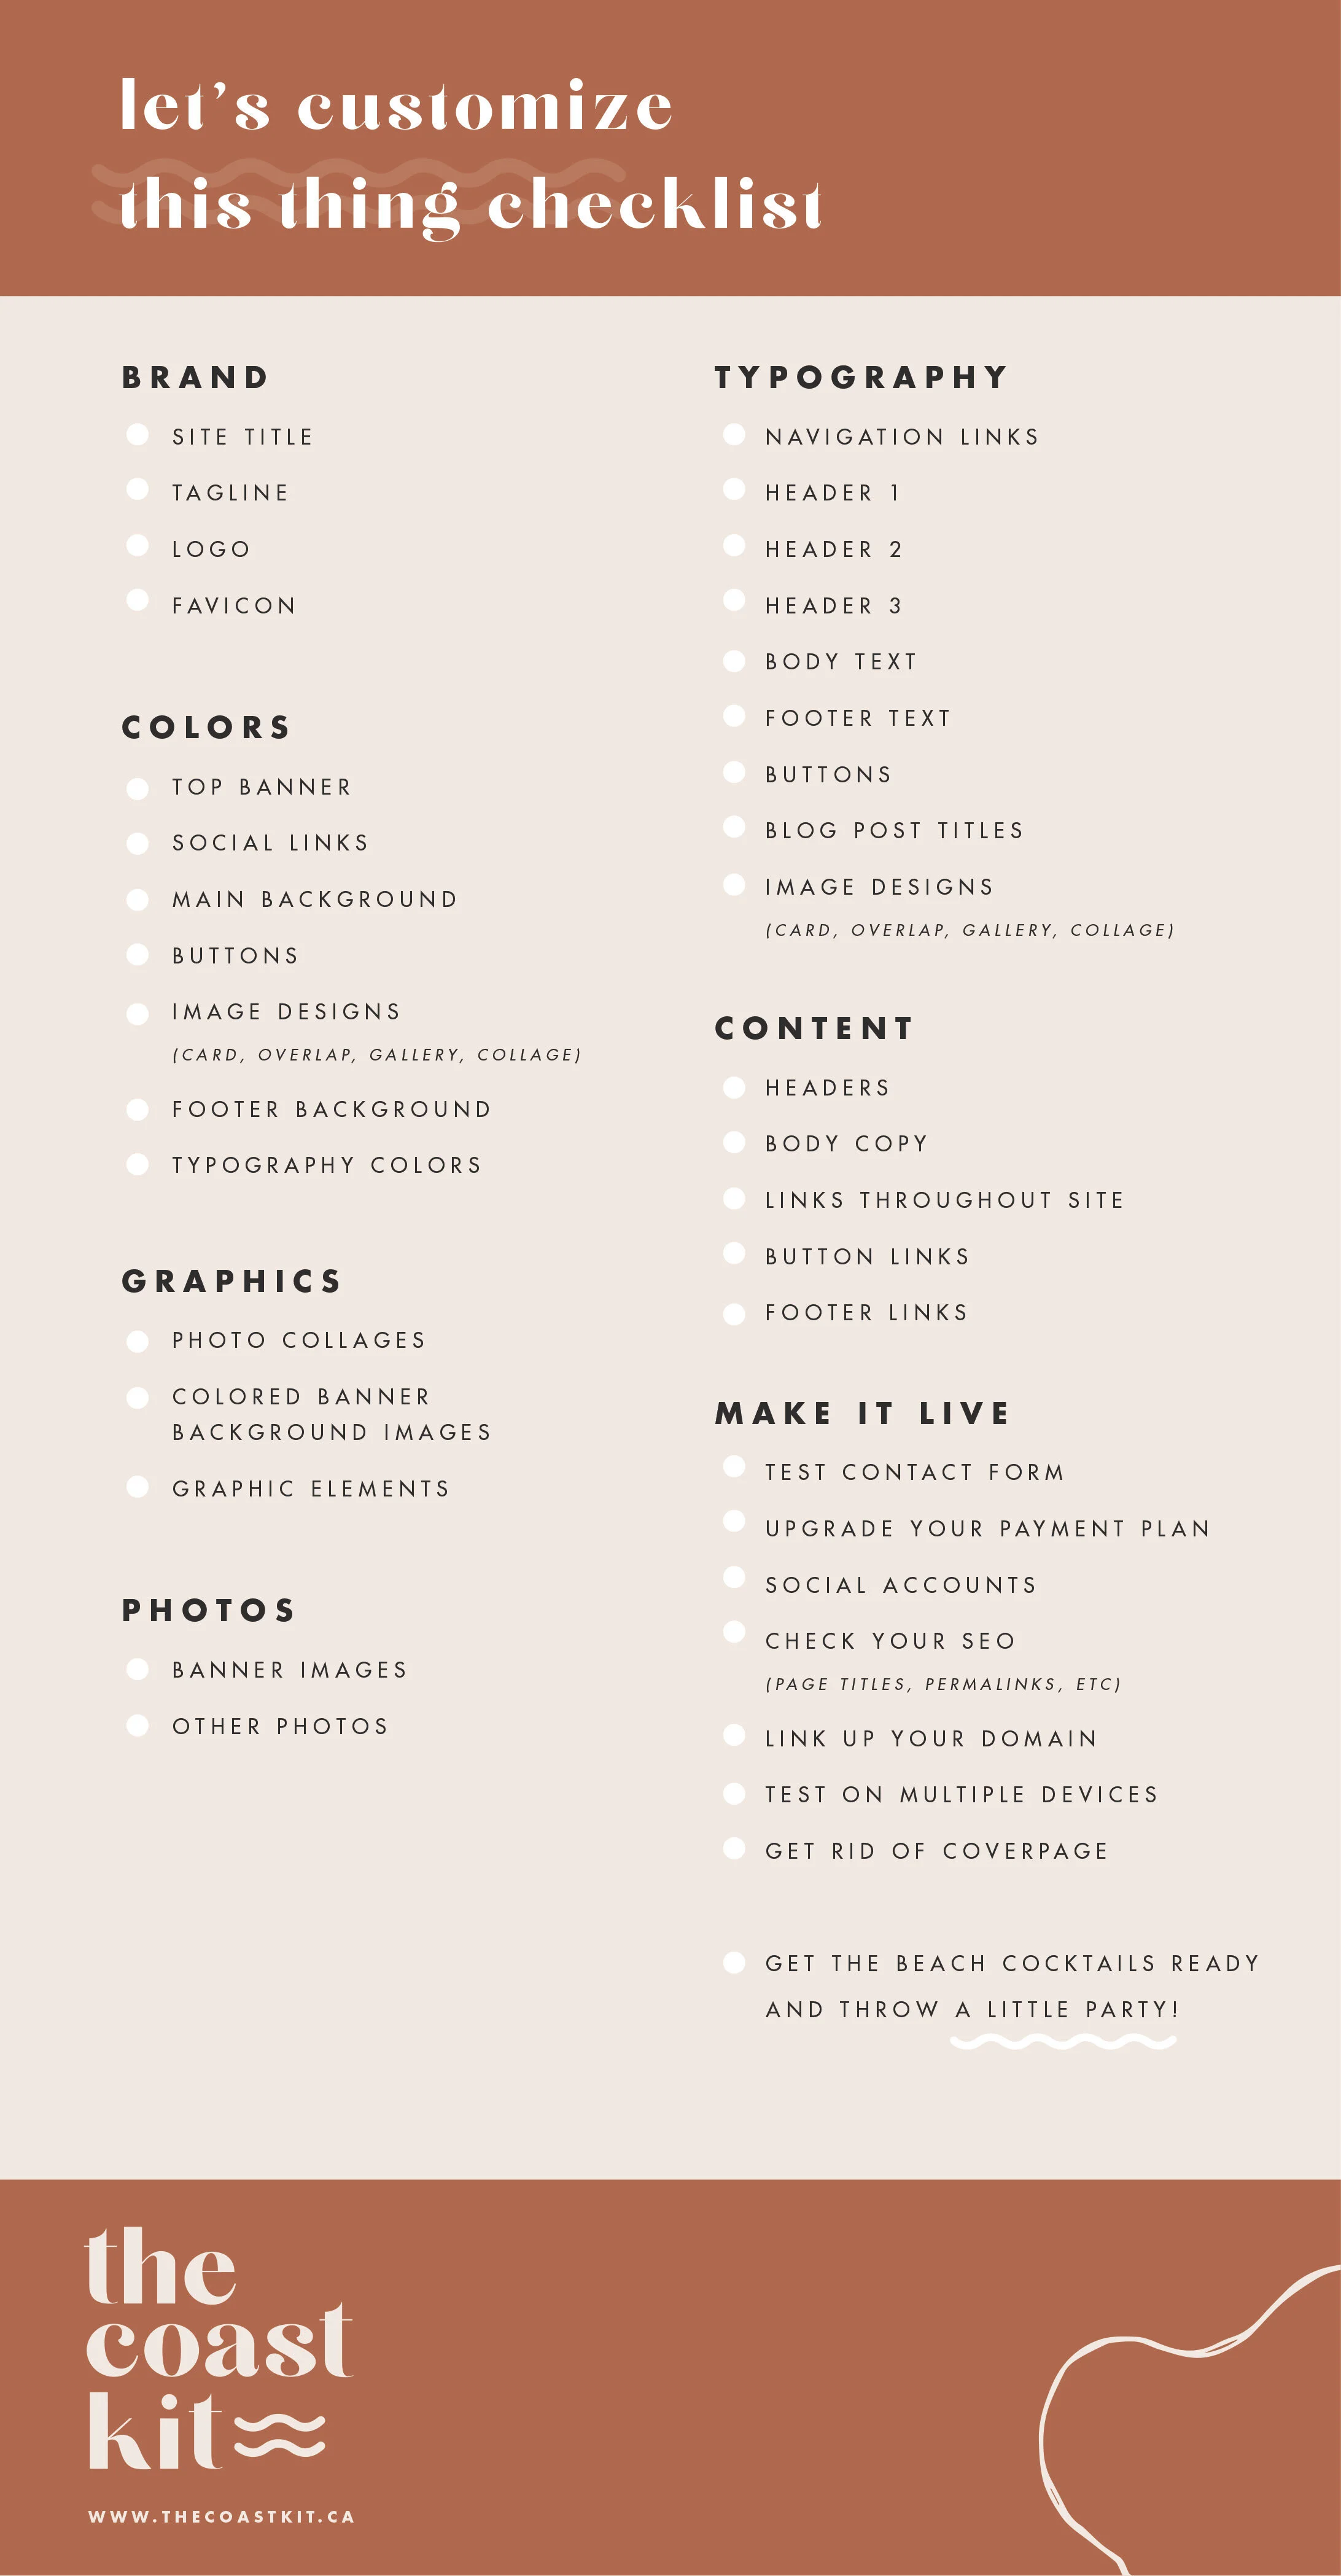
Let's Customize This Thang - Squarespace Templates
How to Customize Your Template Kit to Match Your Business
You know it’s time to stand out, but sometimes the word “template” can mean anything but. You’re probably looking at one of our our template kits and curious how you can not only make it your own, but have it match your business so you can attract your ideal client. Trust us, it’s a lot simpler than you can think and we’ve prepped a checklist for you with easy changes that take it from template to totally yours.
When going through the process of integrating one of our templates, we suggest creating it exactly like the original template. This way, you don’t get distracted by editing your text or switching out photos, and can focus on the bare bones. Once you have that in place, it’s easy to go through and switch out colours, photos, and fonts.
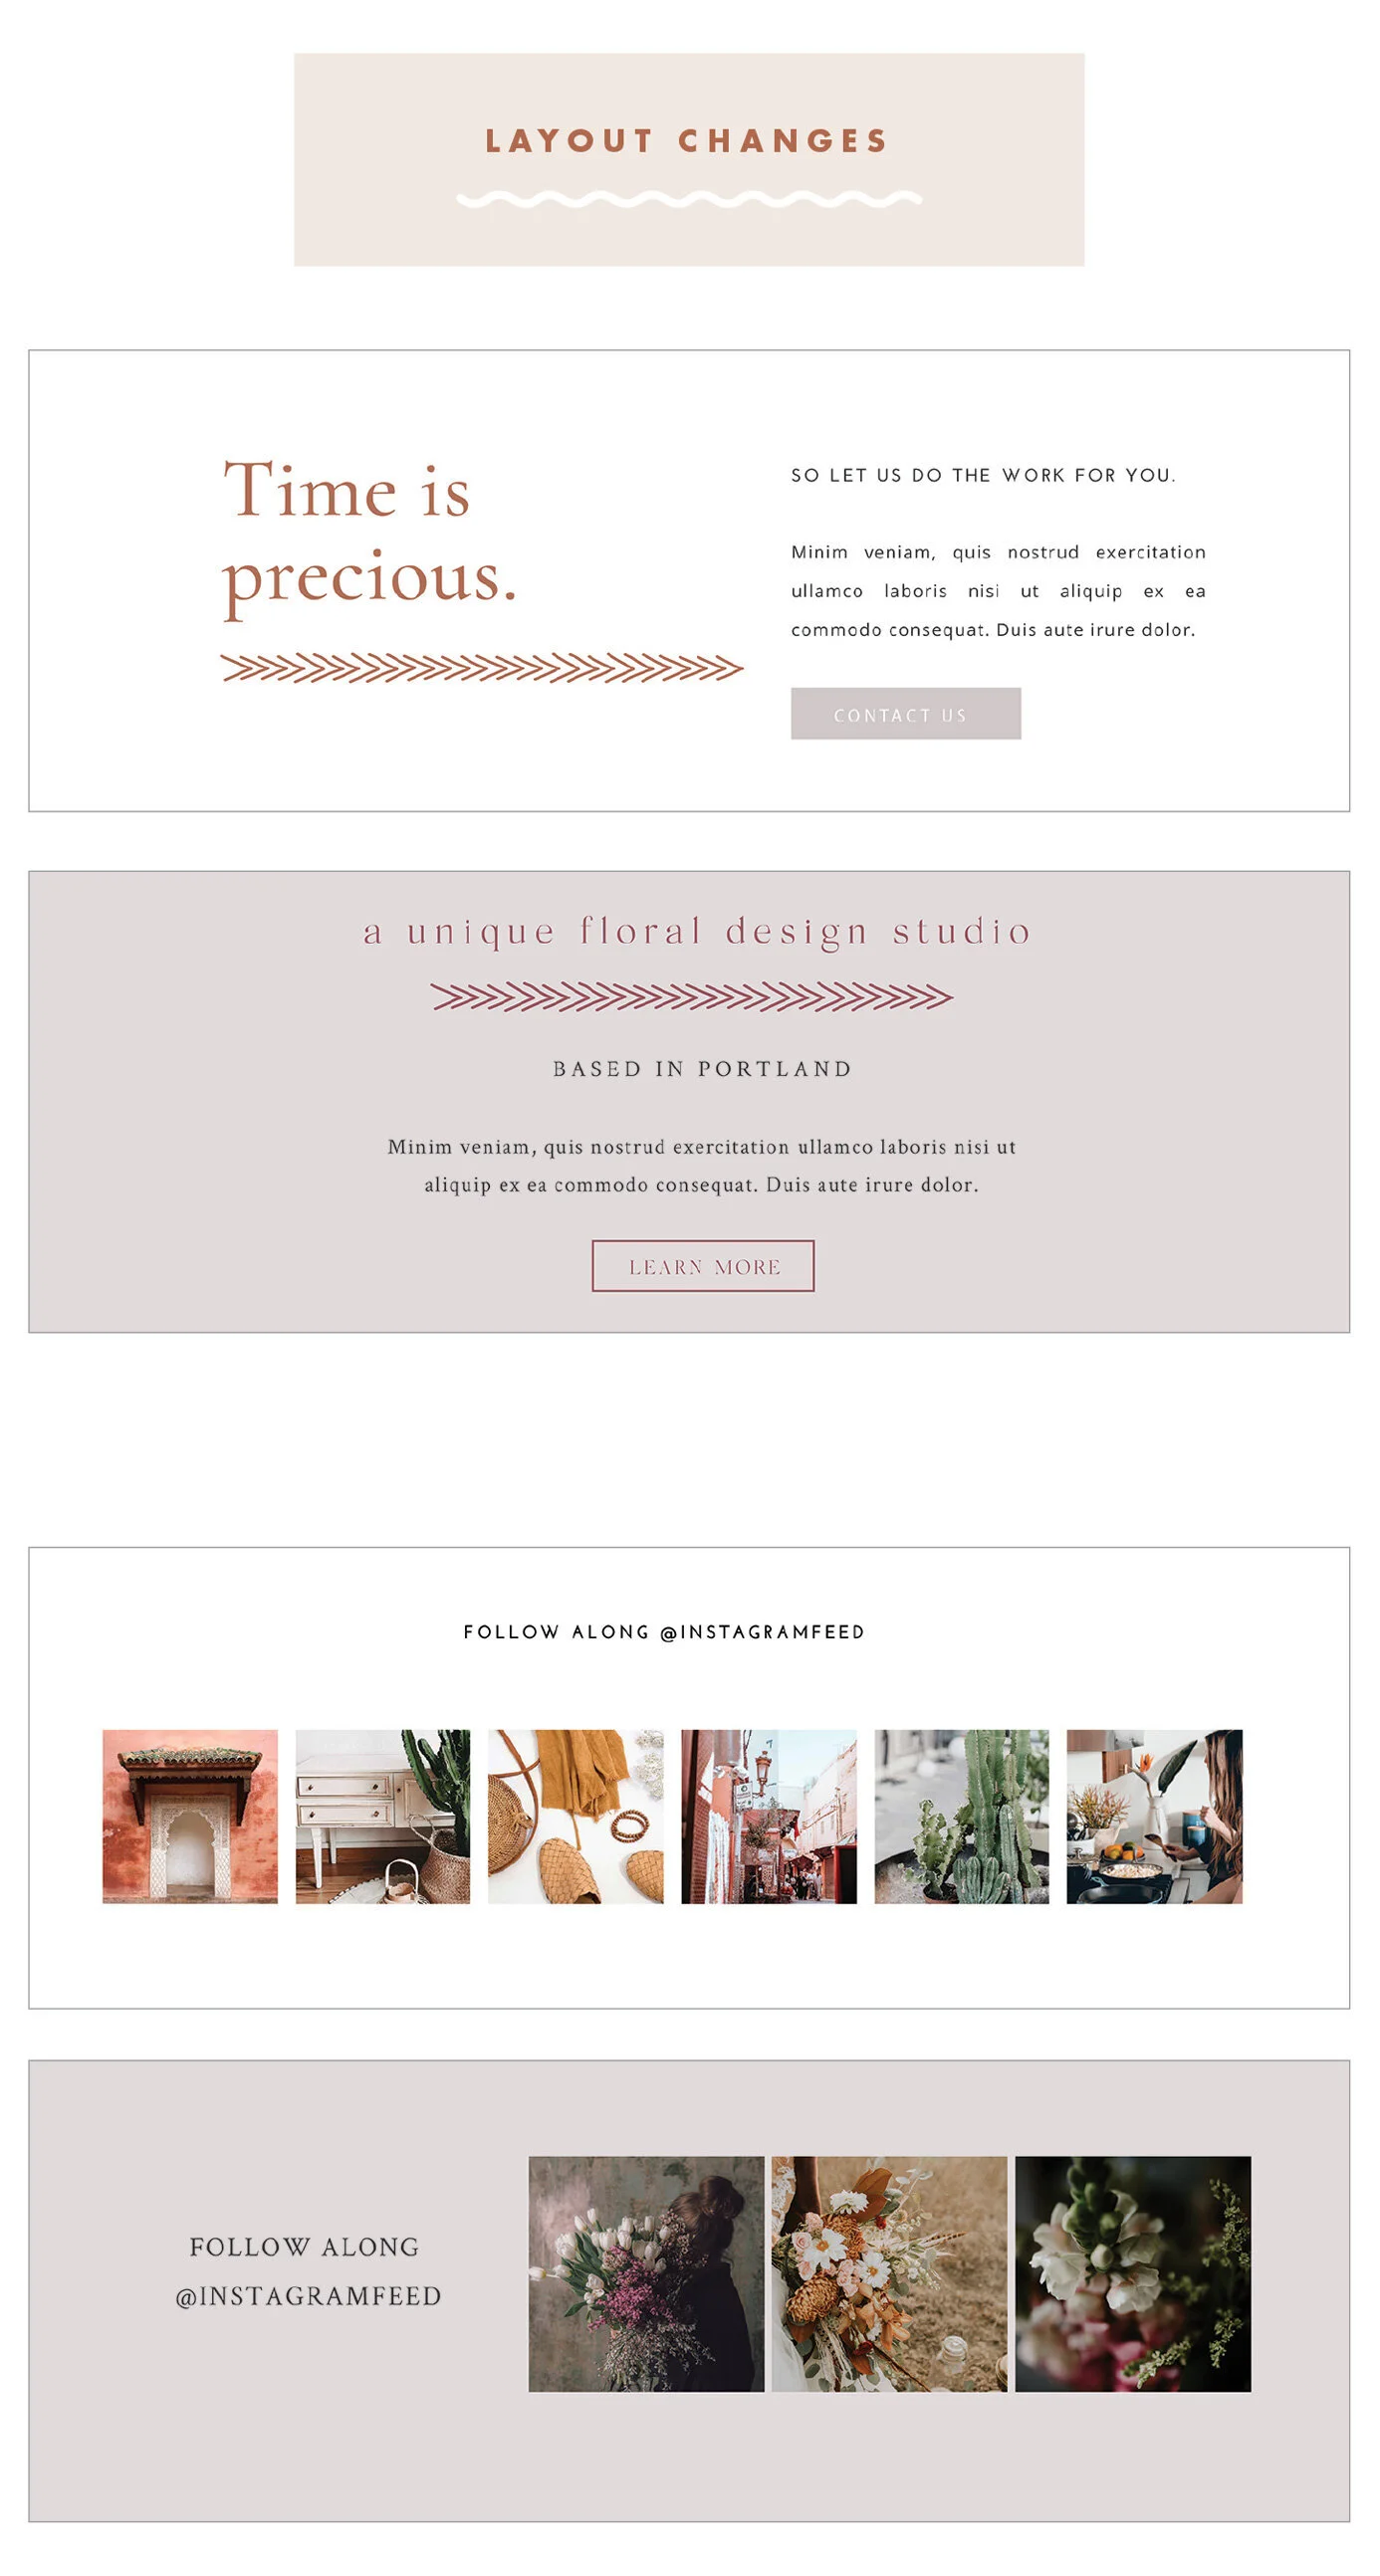
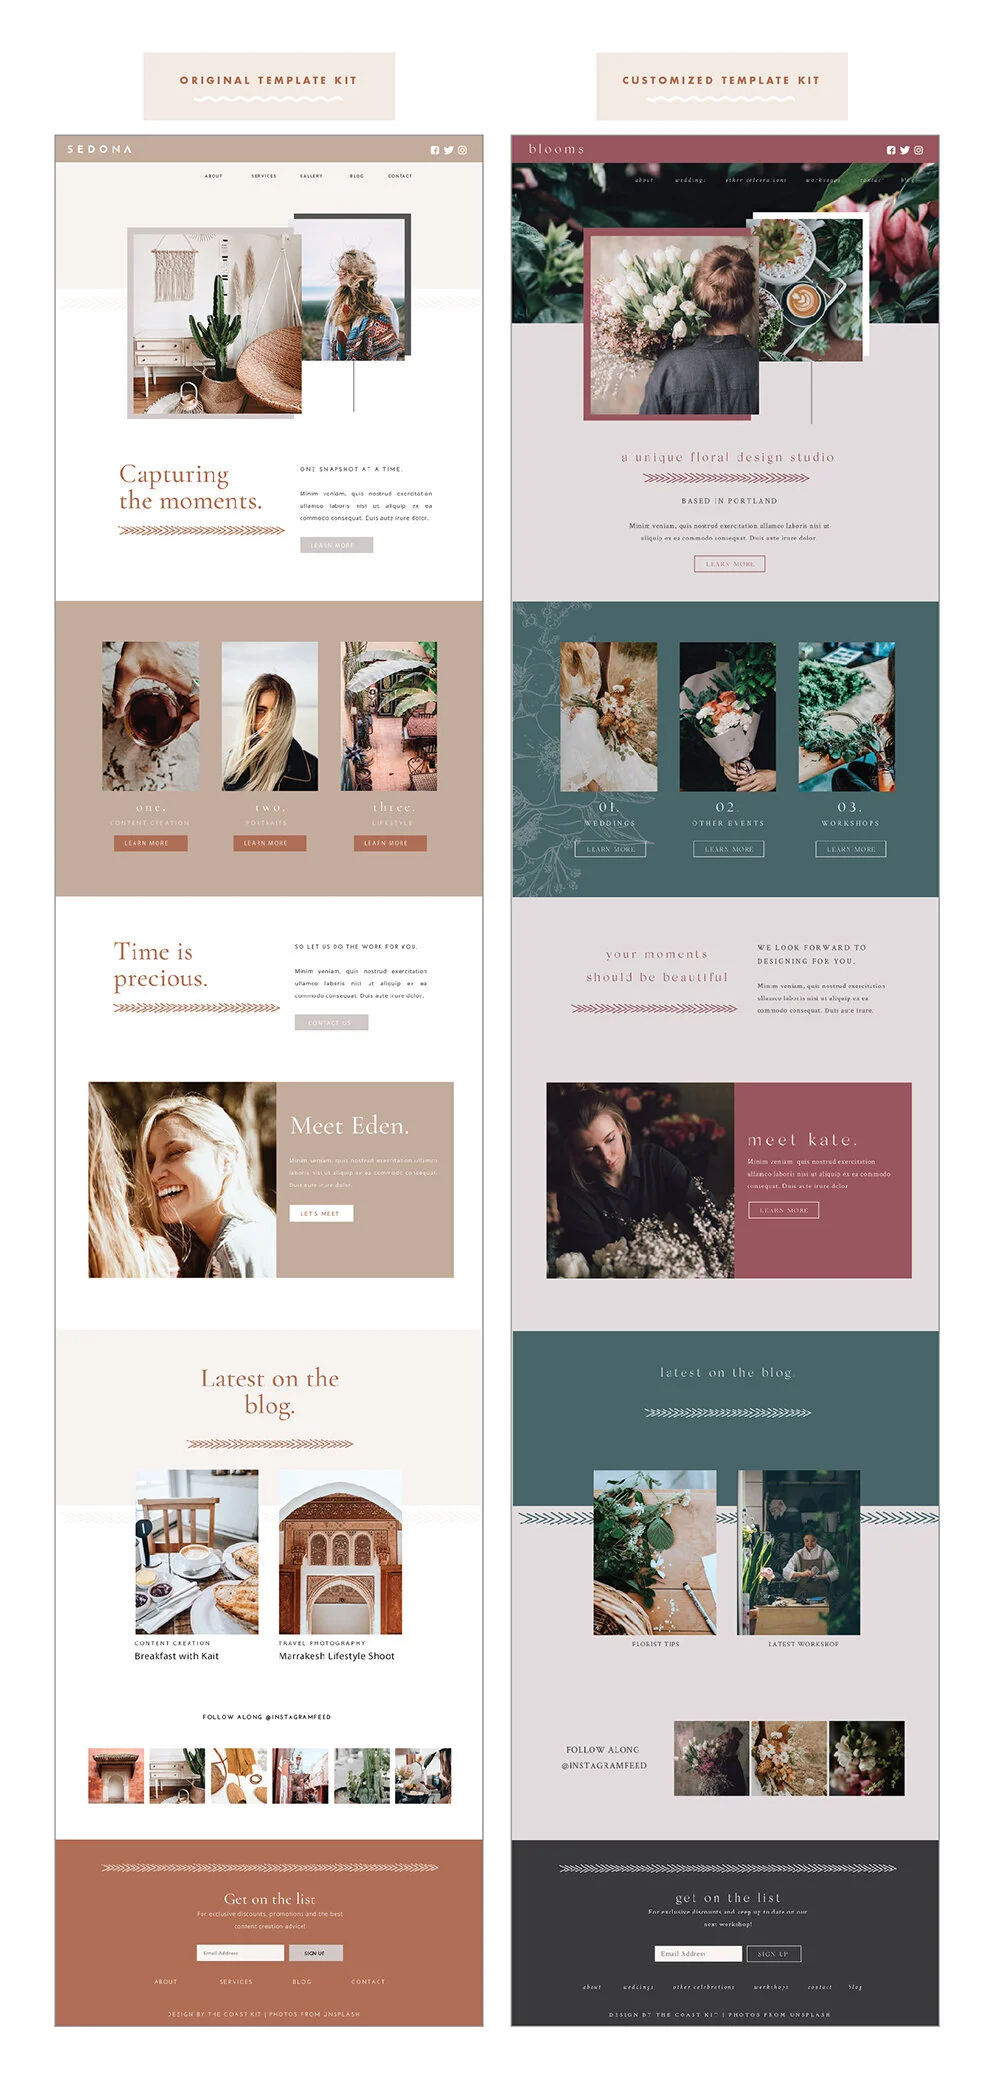
We’ve taken our SEDONA template and revamped it for a florist. It’s got a totally different vibe, but as you can see in our comparison, a lot of the elements are the same.
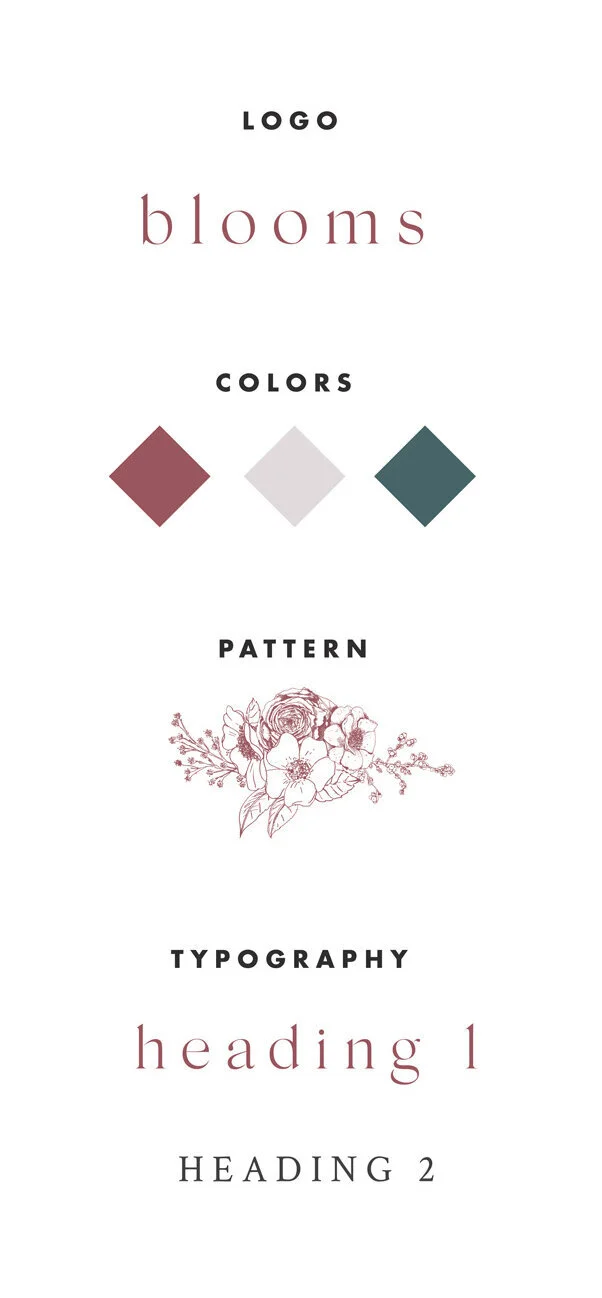
First off, we’d suggest looking at your brand to see what elements you have to work with.
Aside from a logo, is there a color palette you can grab some new tones from, are there patterns you can implement, and maybe your brand has a different feel so switching up the fonts would be a good idea.

site title, logo, favicon
We’ll start with your logo, and there are two ways to make it yours. Back in Squarespace, go to DESIGN -> SITE TITLE + LOGO. You can either upload a logo file there, (we suggest a PNG with a transparent background, approximately 600px wide as Squarespace will resize it to prevent it from looking fuzzy #notagoodlook).
If you don’t have a logo, you can easily use the SITE TITLE option, and go back to your SITE STYLES to update the font and sizing. Quick and easy.
Below SITE TITLE, you’ll notice the option to upload a FAVICON, which refers to the little icon in your web browser. We’d suggest a PNG as well, and to try and keep it to a smaller size (200px wide). Whether it’s a mini version of your logo, a simple icon, or the first letter of your logo, this is just another way to make your website stand out when all those tabs are open!
colors
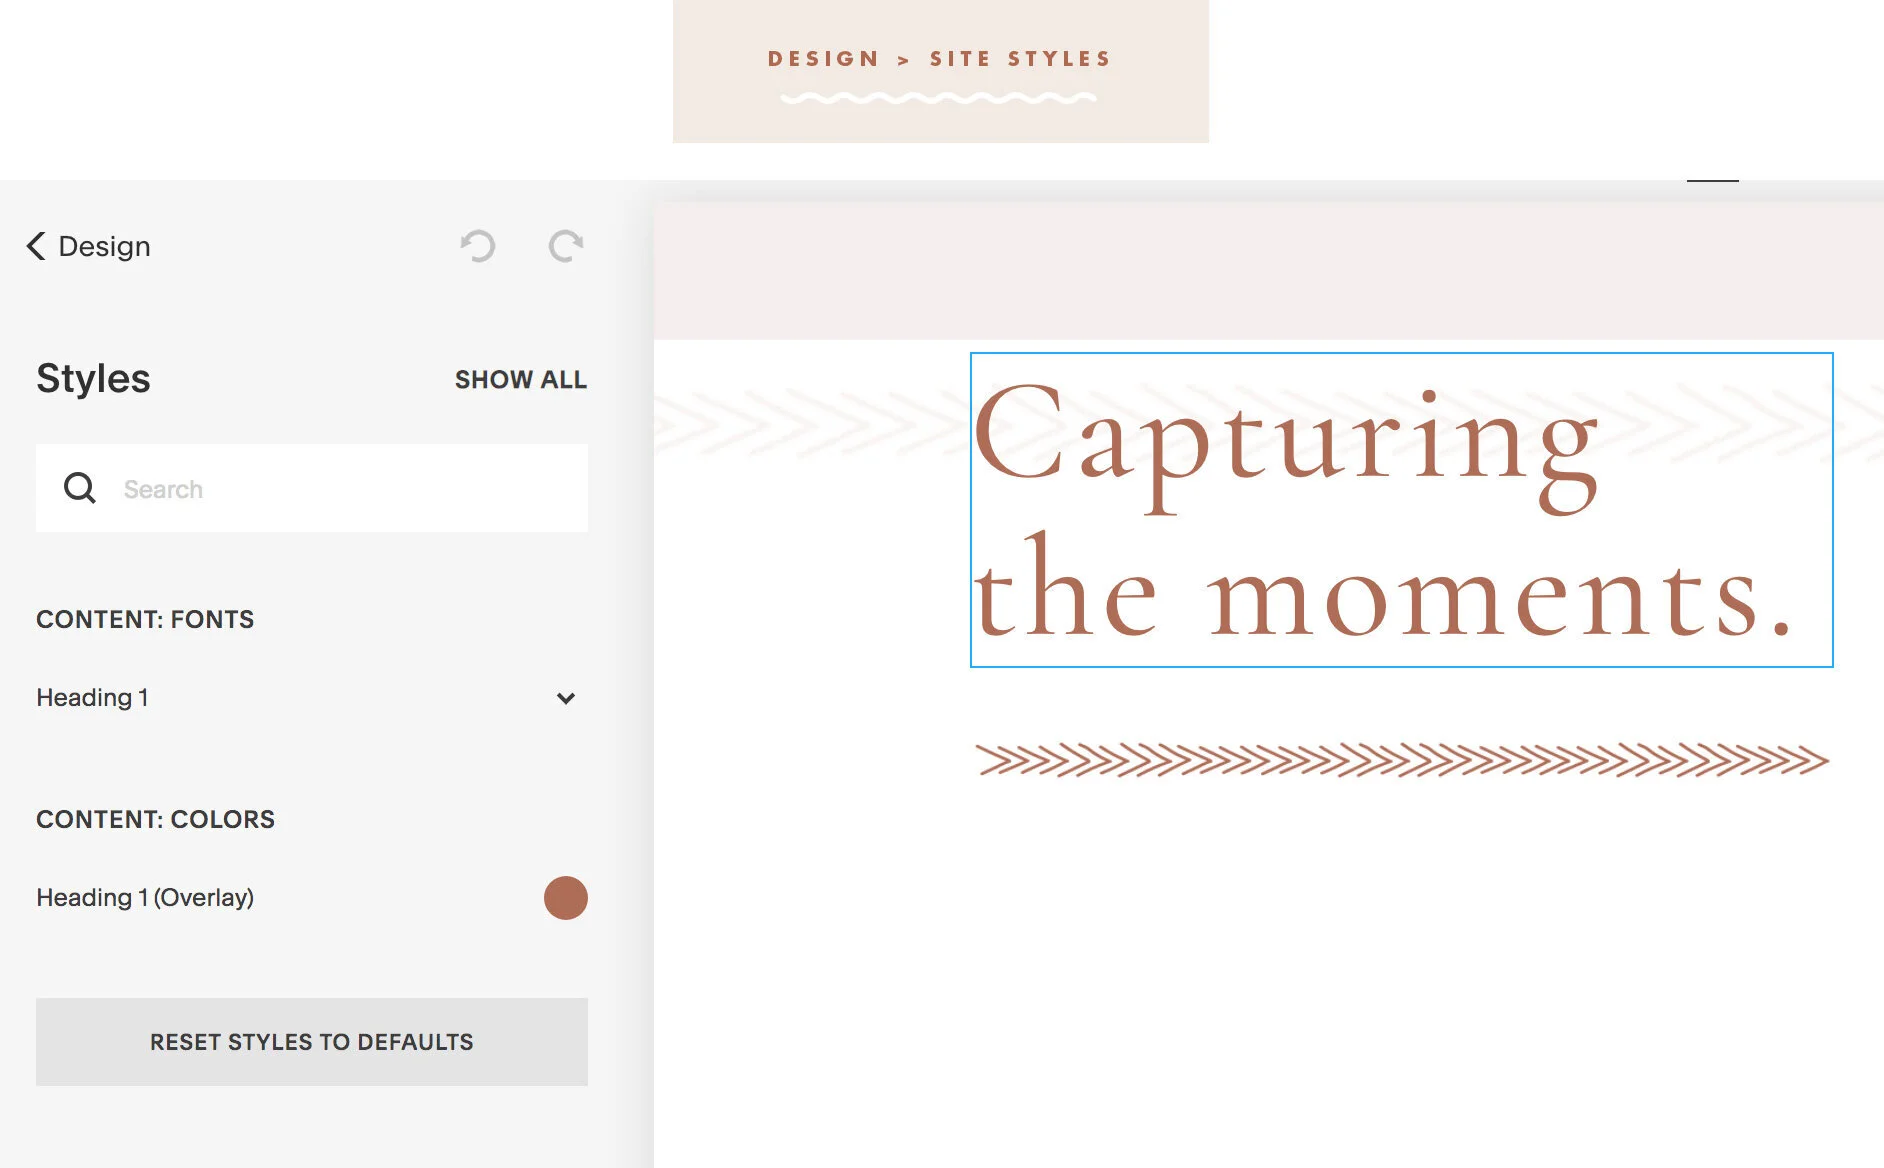
From here, you can really start to have some fun and start to go through all of the sections and update the colors to match your own branding. We’d suggest going to DESIGN-> SITE STYLES and hovering over the section you want to update, as Squarespace will focus on that element (talk about user friendly, and you can always click back to SHOW ALL)
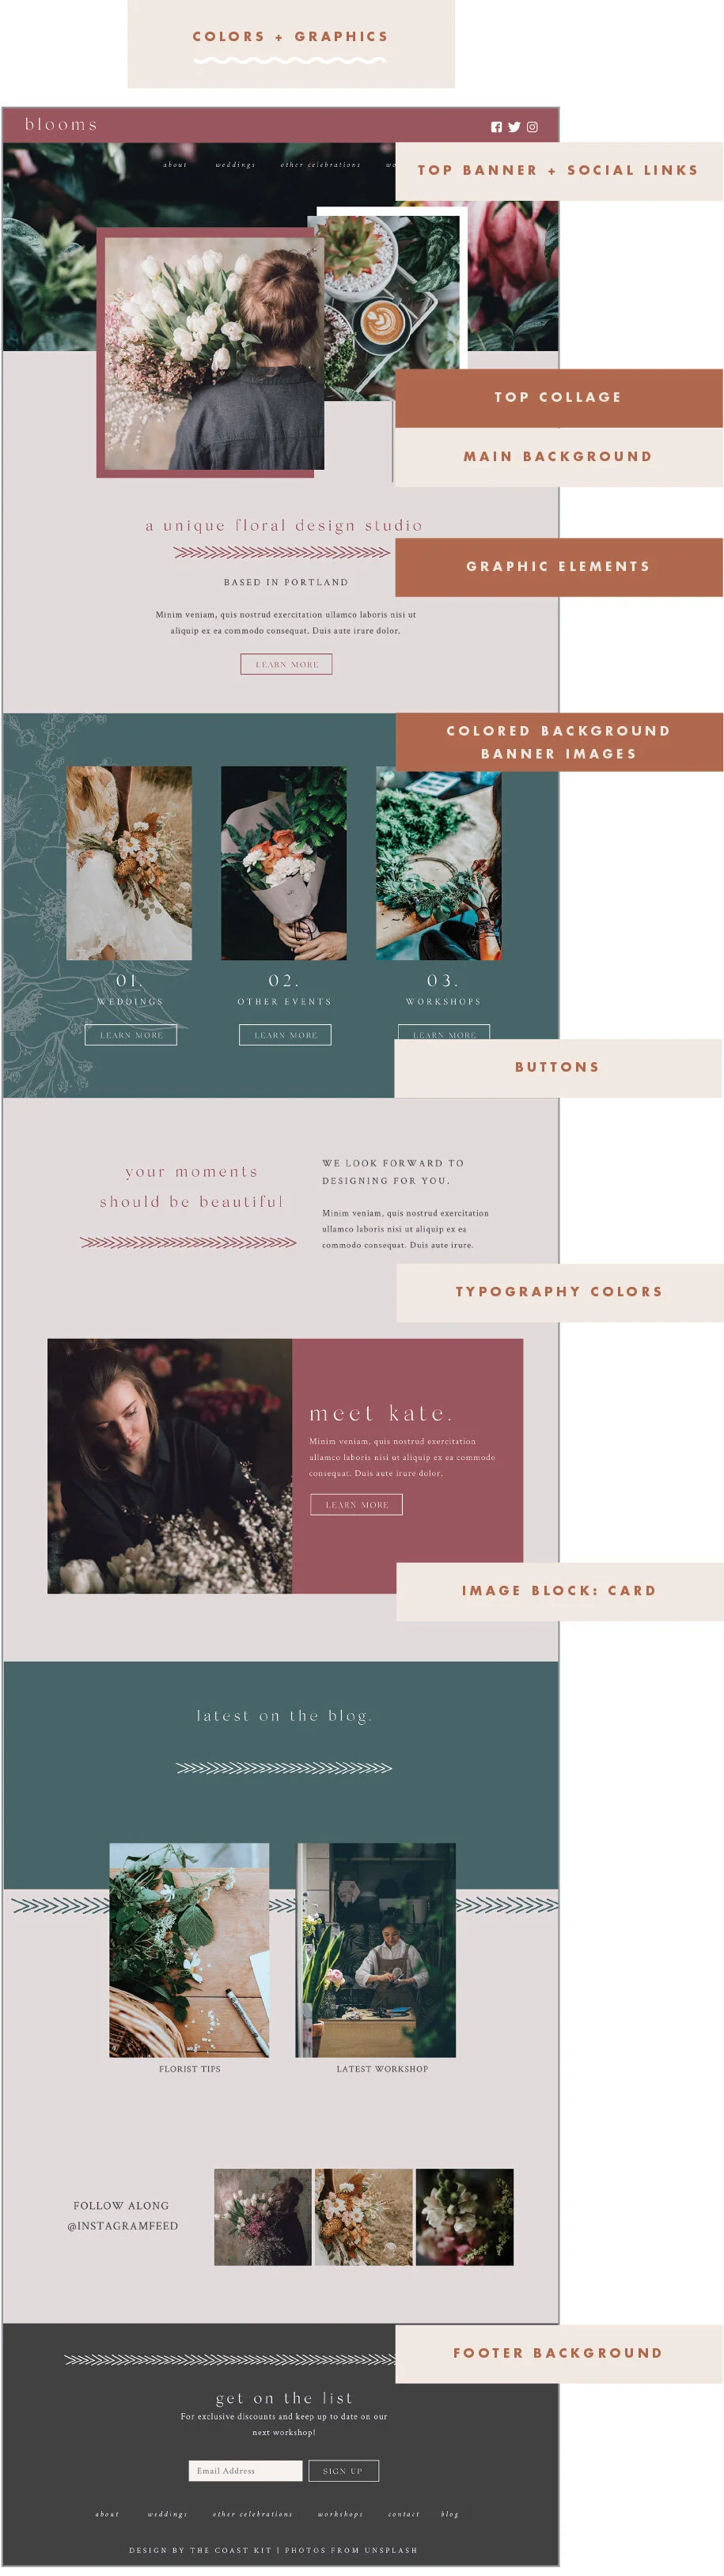
For this revamp, we’ve gone through and updated the colors for a few sections including:
Top Banner (including social links)
Main Background
Buttons
Image Block: Card (for the ABOUT)
Footer Background
Typography Colors
Just make sure you have your hex codes on hand (nifty reminder #000000 is black and #ffffff is white!) and start copying and pasting away.
graphics
There will be some elements that aren’t a quick click of a button, but we’ve created working design files in our template kits (for Photoshop + Canva) so you can easily switch out:
Photo Collages (such as the top image)
Colored Banner Background Images (some with and without patterns)
Graphic Elements (arrow line)
This is also a great opportunity to switch out some of the photos with your own, and we have a few more photography tips in our next section!
We’ve even had a little fun with two of the elements.
For the top banner, we’ve replaced the colored background with a full image.
With our SERVICES back we added a floral pattern to add a little extra to the colored background
photography
Whether you’re good with a camera or not, having great photos is important. We can’t recommend UNSPLASH enough if you need a few stock photos (they’re not just regular stock photos, they’re cool stock photos) as well as other great stock photography resources out there.
Once you have a few photos to choose from (whether you’re own skills or stock), it’s time to get those ready for web. Squarespace does a decent job of optimizing for web, but if possible, try to keep a few things in mind for saving images.
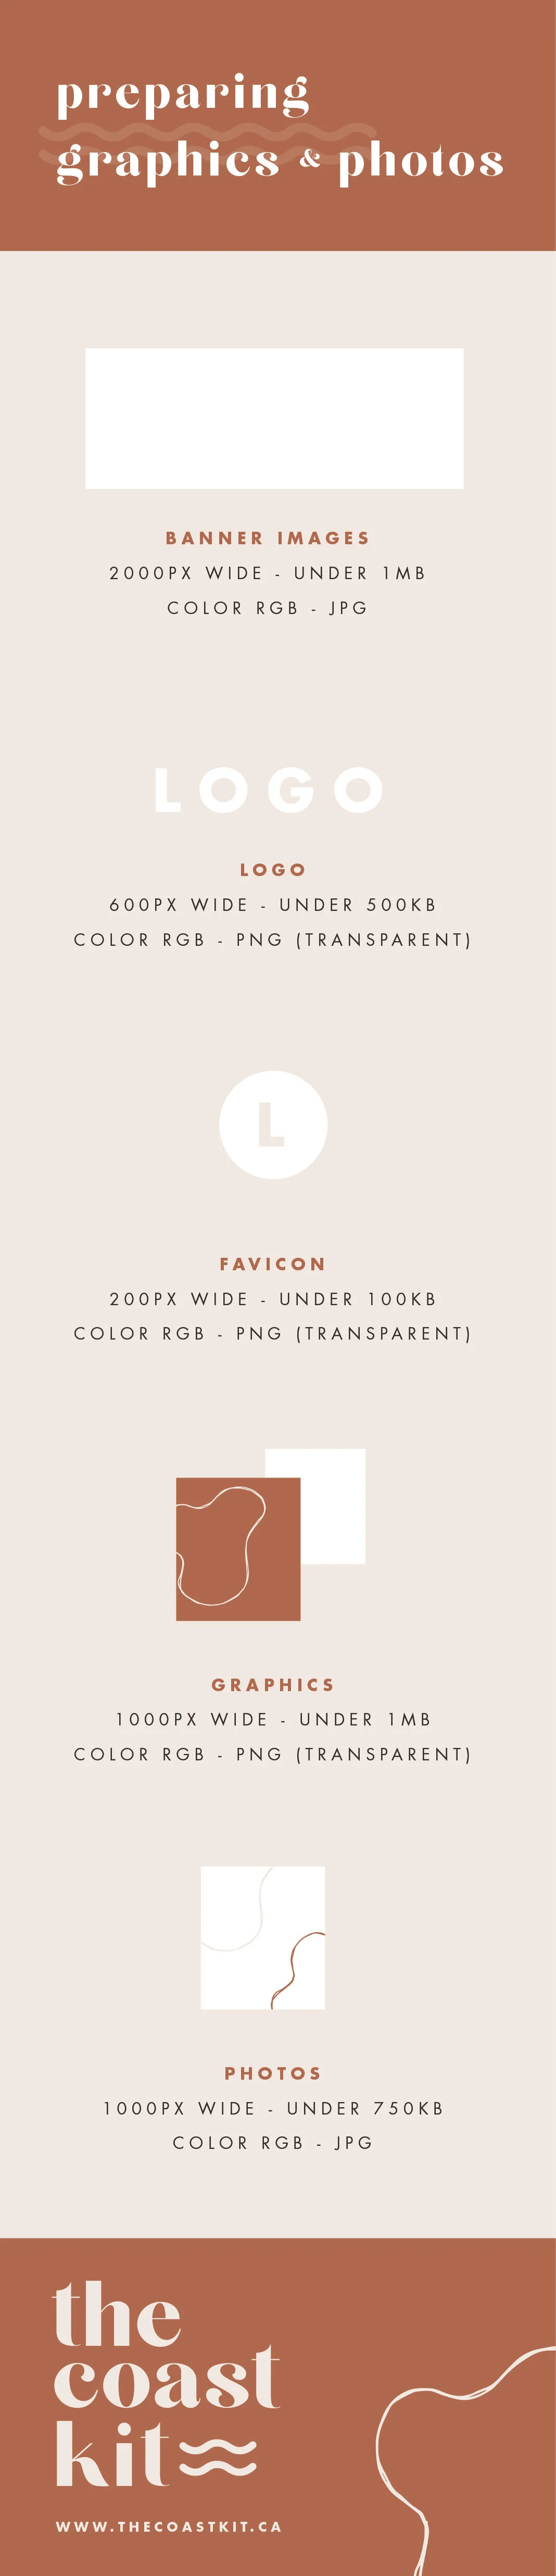
Here’s a breakdown of how to prep your graphics + photos. In our template kits, the “get your graphics on” tutorial video goes over how to achieve this in Photoshop and Canva. And make sure it’s in the RGB color format, don’t be surprised if you upload a CMYK and the colors are whack (those guys are for print, not web).
Banner Images - 2000px wide - under 1MB - color RGB - JPG
Logo - 600px wide - under 500KB - color RGB - PNG (transparent)
Favicon - 200px wide - under 100KB - color RGB - PNG (transparent)
Graphics (such as the collage) - 1000px wide - under 1MB - color RGB - PNG (transparent)
Photos - 1000px wide - under 750KB - color RGB - JPG
typography
Fonts play a large role in the overall feel of your brand, and luckily Squarespace offers a massive selection of fonts to choose from. You can also add custom fonts to your website as well, but it does require a little bit of coding. Using the SITE STYLES again and hovering over your selected element, you’ll likely be wanting to change the font, size, and letter-spacing of:
Navigation Links
Headers (there’s H1, H2, H3)
Body Text
Footer Text
Buttons
Blog Post Titles
Image Designs (card, overlap, collage, etc.)
We always suggest selecting 2-3 fonts, and making sure the headers are different than your body copy to help each element stand out (such as one serif and one sans-serif).
content
And of course, make sure you switch out that content, because if you’re like us, we’re not quite fluent in “lorem ipsum” and dummy text. Make sure to proofread, double check, and proofread once more. This is also a great opportunity to go through and recheck :
Links throughout site
Button Links
Footer Links
We’ve also had a little fun with our layout, as Squarespace makes it easy to drag and drop columns, we’ve switched up the top headline to be only one column, and the instagram feed is now split into two. Moving around the elements can help update the look!
make it live
Once you’ve customized this thang, it’s time to put it out there in the online world (we’re cheering you on!). There’s a few more things to keep in mind before making it live:
Test Contact Form
Upgrade your payment plan
Social Accounts (which you can link up at SETTINGS -> SOCIAL LINKS)
Check your SEO (page titles, permalinks, etc)
Test on multiple devices
Try another computer, and of course your phone. Squarespace has a handy tool to view your website on different devices, but it doesn’t hurt to check on the real deal.
Get rid of coverpage (if you set one up)
Get the beach cocktails ready and throw a little party!