What exactly are Squarespace INDEX pages and why they are a MUST in creating a dynamic website.

Love scrolling through a website that has various sections, each with their own unique touches? Us too.
All of our Coast Kit templates make use of all the great benefits of using index pages, and we’re big fans on how easy it is to create as well in Squarespace.
Just a quick note that these tips are when BRINE is used as the base, similar to all of our template kits that are for Squarespace 7.0. This doesn’t apply for Squarespace 7.1.
how easy you ask?
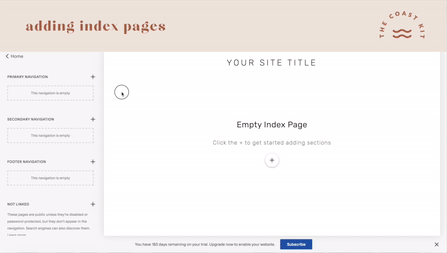
1 / ADD INDEX PAGE
Under your Pages tab, when you’re adding a new page (with the ‘+’ symbol), there is an INDEX option.
2 / ADD SECTIONS
You are then able to add in various sections (+ Add Section under the INDEX you just created) and we recommend either the BLANK or GALLERY option.
2 / RE-ARRANGE
Feel free to add as many sections as you’d like, and it’s insanely simple to drag and drop in any order.
Essentially an INDEX acts like a “parent page” and then stacks all of the additional sections after one another.
banner images
You’ve seen image backgrounds, full color backgrounds, and other fun styles on various Squarespace websites, and just can’t seem to figure it out. The trick? Index pages and using the BANNER IMAGES option.
As you hover over each section, you’ll see a SETTINGS button. Head to the MEDIA tab and upload away. Just make sure the image sizes are wide enough (2000px wide) but not large in file size (under 500mb!)
Pro Tip: To get a full color background without jumping into code? Create a banner image that is one color (easy to do in Canva, and a lot of our template kits we’ve set this up for you!)

style settings
Love that fun, scrolling effect? It’s called PARALLAX SCROLL and can easily be enabled through the Site Styles (under MAIN: OVERLAY). Choosing SMART CROP shows more of the image as well.
Things to keep in mind? When you add in a banner image, Squarespace automatically enables their OVERLAY styles (for example, white text so it can show up on darker backgrounds). Make sure to update the colors in your site styles to work for all of your sections.
You’ll also notice under INDEX: PAGE, we now have two options for padding (referring to the top and bottom spacing) for pages with and without banners (overlay).

duplicating sections
While you can’t duplicate a whole INDEX page (not yet anyway!), you can duplicate any of the sections. This makes it so darn’ easy to have similar sections throughout all of your pages.
Let’s say you’ve designed a top banner, with specific spacing, styles, etc. Duplicate that baby, move it over to another page, switch up the text and photo, and you’ve seriously saved yourself some time.

index: gallery
If you’ve ever seen full-screen slideshows or grids and not sure how to make it happen? Most page sections automatically add padding to the left and right, so the trick here is to add an INDEX: GALLERY into your index page. From there, all of the style options are under STYLE SETTINGS, but keep in mind you can only choose one option for your whole website.

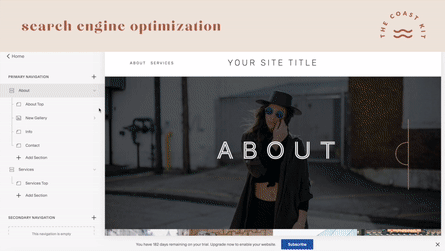
search engine optimization
Three golden words for anyone wanting an enhanced website, and the beauty with index pages, because it adds additional pages below, and therefore more options to use keywords and descriptions.
Each section has their own SEO tab, and make sure to also update the navigation title and url slug to keep it clean and organized.
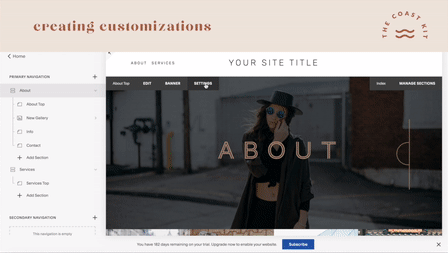
creating customizations
If you’re willing to jump into the CUSTOM CSS code, INDEX pages have made it a-whole-lot easier to focus on the content you want to change. Rather than finding a section with a long, confusing name, we can simply use the url slug to reference.
Jumping into the settings of that section first, if you’ve labeled the url slug of the top section on your about page to ‘/about-top’, you can easily reference that section now in your css with ‘#about-top’.
For example, let’s say we want to designate the font color in that section.
#about-top
{
color: #fff;
}
Or can even take it a step further and just designate the HEADING 1 in that section.
#about-top h1
{
color: #fff;
}
Just know, the code only updates the styles for that section and not a duplicated section, so you may have to grab a new url slug and set the same style settings.
sub menu navigation
If you’re looking to add INDEX pages as part of a sub menu, you’ll have to do a little workaround. First, move those pages down to NOT LINKED so it no longer shows up in your navigation. Then, click the ‘+’ to add a FOLDER to your navigation (under other).
From there, you will then click the ‘+’ to add a LINK to your navigation (also under other) and add the title and link. You can click the settings icon and select a specific page as well.
From there, move that under your new folder as a sub item, and repeat as needed!

Looking for a little more insight on our index pages work? We’d suggest snagging one of our Coast Kit templates as we help you step by step in creating some rad lookin’ pages.

Looking to make a strong first impression with your website?
Our Squarespace website templates may be the right fit for you! Our DIY option allows you to play and plug your content and get you launched pronto!